Search This Blog

Monday, December 27, 2010

Shhhh.....


I hope that you all had a very merry Christmas!  Mine was great, although I worked night shifts at the hospital all weekend.....and we got snowed in - ha ha!  But we got to play santa for all the kids who had to stay in the hospital for the holiday.

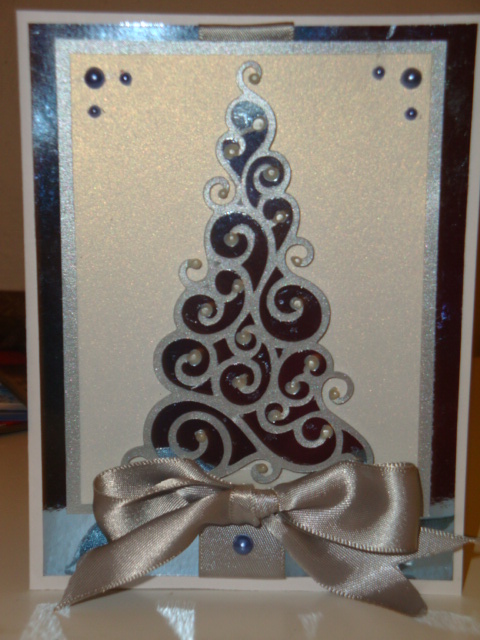
I know it is a little late but I wanted to show you the card that I made for my holiday cards this year.  I used the stamp Shhh.....by Stampavie and colored the image in with copics.  The paper is stampin' up.

Thank you so much for looking! 

Tuesday, December 14, 2010


Wishing my mother-in-law & sister-in-law very blessed and happy birthdays!


Sunday, December 12, 2010

Holiday Mugs


I found some cute coffee mugs at Bed Bath and Beyond and made some personalized coffee mugs for some of my friends at work.  I originally planned to etch them - but love the look of the vinyl.  I filled them with candy and tied a bow - easy peasy & my friends simply love them!

Thanks for looking!

Friday, December 10, 2010

Gibbs 12 days of Christmas swap - day 12


On the 12th day of Christmas I sent to Renee, one of her favorite paper packs!  Well instead of one 12x12 - I sent her 2 8x8 paper stacks of a paper line that she likes.  I cannot wait to see what she creates with them!

Renee, I have really enjoyed getting to know you during this swap and hope that you like what I have made/purchased for you!

Thank you all for visiting my blog!

Thursday, December 9, 2010

Gibbs 12 days of Christmas - day 11


On the 11th day of Christmas I sent to Renee - some goodies to keep her cozy!

I know in the winter time I love hot cocoa and coffee.  Renee is a coffee drinker, so I sent her a can of her favorite brand and 2 personalized mugs for her and her hubby to enjoy a cup together.

Thanks for looking!

Wednesday, December 8, 2010

Gibbs 12 days of Christmas - day 10


On the 10th day of Christmas I sent to Renee - a tool that she has been needing!

This tool looks neat, I may have to invest in one of these myself!

I also sent her some extra goodies - some copics for her new collection and some copic friendly stamped images.


Thanks for looking!

Tuesday, December 7, 2010

Gibbs 12 days of Christmas - day 9


On Day 9 - we shared embossed papers from our cuttlebugs.  I always love having some pre-embossed sheets of cardstock on hand and look forward to receiving embossed sheets from Renee of cuttlebug folders that I do not have.

Monday, December 6, 2010

Gibbs 12 days of Christmas (day 8)


On the 8th day of Christmas, I sent to Renee - treats to share with family!.  I made this ca-ute santa hat boxes by using the cake slice box on the Crisut cartridge - tags, bags, boxes and more.  The boxes are cut at 7.5".  I trimed the bottoms with a feather boa and the tops with a white pom pom.  The insides are filled with yummy hersheys kisses.

Thanks for looking!

Sunday, December 5, 2010

Gibbs 12 days of Christmas Swap (day 7)


On the seventh day of Christmas I made Renee something of my choice:

Last year I had purchased several of these paper mache houses for a swap that I was in.  I had a few left over and decided to use a medium sized house to make a Christmas village clock for my partner Renee for the Gibbs swap that I am in.  I love how it turned out!

Ingredients:

  • Clockworks (from Michaels)
  • Snow-tex (thinned with white acrylic paint for roof and sidewalk)
  • Glitter cardstock from stash
  • Red pearl pen
  • Martha Stewart branch punch
  • Martha Stewart crytsal coarse glitter
  • Windows and doors cut from Cricut Christmas Noel cartridge
  • Diamond stickles
Thanks so much for looking!

Saturday, December 4, 2010

SST Christmas and Countdown to the New Year Blog Hop!

Christmas is coming and so is the new year! To get you in the spirit of the season, the divas of Sistas Scrap Too! have come together for a Christmas and Countdown to the New Year blog hop! There are 17 blogs in the hop, so make sure you use the links below this post to hop to all of the participating blogs. No worries if you miss one, you can always go back! These 17 divas have a lot in store for you. From exquisite creations to offers of blog candy, you will enjoy hopping your way to all of the blogs involved! Don't forget to leave some blog love for the creators -- they love getting feedback on their designs!

Joy Card


I have really begun to love the look of a square card and have stepped out of the box so to speak and made this 5" joy card.  I got inspiration from this card from the accordian fold ornaments that have been popping up everywhere.  I layered some cardstock that I had on hand and added a bow, light blue viva decor pen, stickles and embossed joy in the center of the card.  Thanks so much for looking and I truly appreciate you comments!


Thank you for participating in the Sistas Scrap Too! first ever blog hop! Remember to visit all of the blogs and leave blog love -- you never know where you'll find candy!! Here is a linked list of all the participating blogs:

1. Treva's Craft Corner
2. Stampin' Dymonz Creative Space
3. Nubian Crafter NC
4. My {Life}, My {Blog}
5. Step Into Nita's World
6. Sweet Lil Scrapper
7. P-Kaysunshine Creations
8. Sharing My Stuff
9. Yaya Philly Craft World
10. Cassie's Crop Corner
11. M. M. DeZigns
12. Made By Dee
13. Riley's Custom Creations
14. It's A Family Affair!
15. Cuttin' Up
16. Stamping On The Road
17. In Shelly's World

Gibbs 12 days of Christmas - day 6


Day 6 of the Gibbs 12 days of Christmas swap was for an item covered in paint.  I made a set of Christmas candle holders out of some extra wine glasses that I had on hand & sent some mulberry candles along in true Christmas fashion!  I used Vitrea 160 glass paint pens to draw them images on the wine glasses and then backed them as instructed. 

Thanks so much for looking!

Friday, December 3, 2010

Gibbs 12 days of Christmas - day 5


On the fifth day of Christmas I made Renee a polar bear snowglobe with dangling jingle bells.

I saw a similar craft item in Michael's with a snowman and could not resist putting these two playful polar bears in the snow.  The polar bears are actually ornaments ( I just cut the gold strings off) and tied a ribbon around there necks.  I used some epoxy to glue the polar bears down into the apothecary jar.  The snow that theyare playing in is actually styrofoam that I grated.  I tied a ribbon around the top (to hide the glue that seals the jar closed) and the bottom.  There are three red jingle bells dangling from the bow.

Thursday, December 2, 2010

Gibbs swap - day 4 (ornaments)

Day 4 of the Gibbs swap was ornaments that spin.  I made 3 ornaments for Renee.  One was made using the nestabilities spellbinders Fleur de Lis tutorial.  I love the outcome of this ornament.


I also made 2 ornaments using the clear craft ornaments from Michael's.  I coated the inside of the ornaments with acrylic paint and then decorated the outsides of the ornaments with stickles.


Thanks so much for looking!

Wednesday, December 1, 2010

Gibbs 12 days of Christmas - day 3, set of cards


Day 3 of the Gibbs swap was a set of cards to send to family.  Renee wanted all Christmas cards so armed with my copics I set out to make her a set of cards that I hope she will be proud to give out this year!

Tuesday, November 30, 2010

Gibbs 12 days of Christmas - day 2 ATC's


On the second day of Christmas I made Renee - ATC's in the 12 day of Christmas theme

I found these cute images online and printed them on white cardstock.  I matted them to ATC size 3.5" x 2.5" - these were my first atc's so I was nervous.  I wanted her to be able to display them for the holidays so I purchased a shadowbox at Michael's for around $5 and covored it in Christmas cardstock.  I embellished with some ribbon and Christmas floral picks.  This was by far one of my favorite items I made this round.

Thanks for looking!

Monday, November 29, 2010

Joy Banner - Day 1


Day 1 of the Gibbs swap - banner with lots of bling!

I saw the idea of the reindeer while blog hopping one day and went from there.  This was my first banner and I had so much fun creating it.  The base of the banner was made with accordian fold medallions.  One each end of the banner is a reindeer that was cut from the Cricut Christmas Noel cartridge at 4.5", the antlers are wooden accent pieces that I painted gold.  The letters are cut out using the Winter Woodland cricut cartridge.  The letters are cut out at 5" and layered.  The snowflake in the mdddle of the 'O' is from the Christmas Noel Cricut cartridge cut at 2.5" - I blinged it up with some stickles.  I added lots of red rhinestones, ribbon and miniature ornaments to help decorate this banner.

Thanks so much for looking!

Sunday, November 28, 2010

Gibbs 12 days of Christmas Swap!


I hope that you all had a wonderful Thanksgiving holiday!  I had an amazing time visiting my family down in Georgia!  Now I am in full Christmas mode and ready to put up the Christmas tree and decorate the house. 

I have been fortunate enough to have met a wonderful group of ladies on the cricut message board. I joined in my 3rd Gibbs (girl I'm broke box swap) and I am so excited and pleased with my growth. I was partnered with a wonderful lady named Renee whom I have enjoyed getting to know and create for.

Our theme for this swap was the 12 days of Christmas. So for the next 12 days I will be posting the 12 items that I created/purchased for my partner.

Thanks so much for visiting my blog!


Thursday, November 25, 2010

Happy Thanksgiving


Happy Thanksgiving all!  I hope that you are all celebrating this season with your family and friends.  I am lucky enough to be able to spend this time with my husband, mother, sister, nieces and nephew.

Have a blessed holiday!


Friday, November 19, 2010

Christmas Fun with Vinyl


I have been drooling over some of the creations on Nicole's blog and decided to play around with some vinyl on my gold chargers I put on the table for Christmas.  I also did a set of 4 wine glasses that I picked up at the dollar store.

  How I love that lacy tree - but it was a pain in the butt to lay straight (note to self - get some transfer tape).  But I like the way they look and really like the look of the table, even though it is not even Thanksgiving yet.  My poor husband just shook his head as I asked him to pull out the Christmas totes for me....ha ha!  Thanks Nicole for the inspiration and I have so many ideas for Christmas gifts for my friends now!

Thanks for looking!

Saturday, November 13, 2010

You are simply amazing!!


I received this image from an image swap on the splitcoaststampers (SCS) forum.  I could not wait to color her up.  She was screaming to be paired with the DCWV all dressed cardstock and prima 'say it with pearls'.  I used a sketch from the peachykeen stamps challenge blog and will be entering this card in this weeks challenge.  The image was colored with copic markers.

Thanks so much for looking!

Friday, November 12, 2010

Snowmany thank!


I made this card with Peachy Keens winter peekers .  This was one of my first Peachy Keen sets and I still love it for winter and holiday cards.  I make this card for a friend of mine that has been oh so kind to me.

Ingredients:

Cardstock:  Stampin' Up
Designer Paper: DCWV Christmas combo stack
Embellishments:  ribbon, silver viva pearl pen, chipboard snowflake, stitching

Image colored with copic markers
YG67, YG63, B26, B23, B21

Thanks so much for looking!


Thursday, November 11, 2010

Tilda in leaves fall card


I would love to thank everyone for following the "Fall Girls" on their first blog hop (this is my first blog hop too - so I am excited!).  You should have arrived here from Green Isles Crafts   The Fall Girls was started on the splitcoast stampers website and is composed of myself and 14 remarkably talented women.  I joined this group to be able to grow creatively and for inspiration and I love sharing my crafty creations via my blog. 

Our theme for this blog hop was a fall theme.  I picked the Tilda in leaves image that I just received from their Autumn collection.  I embellished the card with some leave buttons found on clearance at Michaels's and some recollections pearls.  I colored the image with copic markers. 

Thanks so much for stopping by!  Your next stop on the blog hop is a diamond in the rough.

If you are just joining up you can start this wonderful blog hop journey from the beginning by visiting Something to Scrap About.

Wednesday, November 10, 2010

Tilda "Thanks so much"


This is the first time that I have made a card specifically for a challenge and I must say that I like it.  I just may have to complete them more often.  I used the Tilda with cherries from the cozy Autumn collection.

Ingredients:

Cardstock:  Stampin' Up
Designer Paper:  DCWV sweet stack
Nestabilities:  scalloped ovals, circles

Embellishments: recollections flowers, olive ribbon, plum blossom cuttlebug folder

The image was colored with copics-
Hair and shoes:  C9, C7, C5, C3
Dress, scarf, cherries & socks: R39, R37, R35, R32 & YG67, YG63


I am entering this card in the following challenges:


Thanks so much for looking!


Monday, November 8, 2010

Caught a bug?


I made this Tilda 'caught a bug' card for a dear friend who has been sick for what I am sure seems like forever to her.  This was the first time that I tried stitching on a card, it always looks so good on others cards - but I will keep practicing at it.   I ordered a sew easy so hopefully that will make this process smoother.

Image:  Tilda with lady bug

Copics

Skin:  E000, E00, E01
Reds used R29, R27, R24, R22
Greys used C9, C7, C5, C3

Embellishments - red viva pearl pen, Martha Stewart ladybug border punch, recollections flowers.

Thanks for looking!